The Solomons Campaign: THE BATTLE OF GUADALCANAL, Part II
Guest writer Chuck Hill joins us this week with Part II of his detailed write-up on the surface action off Guadalcanal in November 1942. Lots of lessons to be applied to today (see the roll-up at the end). BTW – whilst composing this submission he became a grandfather, so we lift a major league ‘mazal tov‘ his way…

- PDF Action report of the Battleship Night Action between the U.S. and Japanese forces off Savo Island on November 14-15, 1942.
The Japanese had been relatively successful in increasing the number of men on Guadalcanal using warships as transports, but these men needed supplies and heavy equipment if they were to push the Americans off the island, and for that they needed to use larger, slower transports which would bring down even more men as well. Before these relatively vulnerable ships could venture near Guadalcanal the Japanese needed to cripple Allied air power out of Henderson Field.

An effort to do that had been stopped at great cost by Admiral Callaghan and his force of cruisers and destroyers in the predawn hours of November 13.
The eleven transports had already been en route when Admiral Tanaka, charged with escorting the transports, learned that Admiral Abe had been unable to bombard Henderson field. He and his eleven destroyers had wisely turned the transports north and returned them safely to base.
Unfortunately for the crews of the transports, that was not to be the end of their adventure. No sooner had the transports under Tanaka’s protection reached the safety of his base in Shortlands, than they were turned around to try again.
After Admiral Abe having failed, Admiral Kondo sent down a force of six cruisers and six destroyers under Vice Admiral Mikawa (who had been in charge at the Battle of Savo) and Rear Admiral Nishmura to try to knock out Henderson Field. While a heavy and two light cruisers along with 6 destroyers watched their back, three heavy cruisers fired 1,370 eight inch shells at Henderson field. But 277 lbs. eight inch shells could not do what 1378 lbs 14 inchers had done in October. One dive-bomber and 17 fighters were destroyed and an additional 32 fighters damaged, but Henderson Field was still operational. Planes from Enterprise and Espiritu Santo, frequently fueling and rearming at Henderson

Field would join those already based there in what would be one of the busiest days in the short but eventful history of the Marine Air Base.
After the bombardment Mikawa’s six cruisers and six destroyers, turned to the task of providing support for Tanaka’s convoy. They were attacked by air the following morning. Heavy Cruiser Kinugasa was sunk by dive bombers from the Enterprise, and three cruisers and a destroyer damaged. This was enough to make Mikawa abandon the transports and head for safety.
The planes then turned their attention to the transports. At the cost of only five aircraft, one heavy cruiser and seven transports were sunk, in addition to several other ships damaged. Tanaka and his destroyers did manage to save most of the men from the transports, but their supplies and heavy equipment were lost.

NIGHT BATTLE, 14/15 November
Mikawa’s bombardment the night of 13/14 November was unopposed except for two PT boats that launched six torpedoes without results. Halsey and his staff had intended to detach battleships Washington and South Dakota from Enterprise’s Task Force (TF16) to contest Japanese attempts to knock out Henderson Field, but poor planning had thwarted their intention. Washington, South Dakota, and four escorting destroyers were designated Task Force 64 under Rear Admiral Willis Augustus (Ching) Lee. Halsey and his staff had incorrectly assumed TF16 was further north and waited too long to cut them loose. By the time they got to the area, Mikawa was long gone. This may have been fortunate in that, while Mikawa’s bombardment failed to halt operation of Henderson Field, a night engagement with Mikawa might have left TF 64 too weak to counter the much greater threat that was on the way.
Vice Admiral Nobutake Kondo, commander of the “Advanced Force†formed an “emergency organization†adding battleship Kirishima, light cruiser Nagara, and four destroyers from Abe’s “Raiding Group†and light cruiser Sendai and four destroyers from Vice Admiral Kuita’s Carrier support group to his own “Main Body (Attack Group).†Two destroyers from Tanaka escort also joined as late reinforcement. The totals looked like this:
| Japanese | US | |
| Battleships (BB) | 1 | 2 |
| Heavy Cruisers (CA) | 2 | |
| Light Cruisers (CL) | 2 | |
| Destroyers (DD) | 11 | 4 |
| Total displacement | 92,763 | 82,202 |
| (Displacement is standard tons as found in Chesneau’s, Conway’s All the World’s Fighting Ships, 1922-1946) |
TF64, like Kondo’s bombardment group, was an ad hoc organization. Washington and South Dakota had never worked together and the four destroyers were from four different divisions, chosen only because they had the most fuel. The destroyers did not even have a designated division commander. Lee, like Callaghan, chose a column formation, but all the destroyers were  placed 4,000 to 5,000 yards ahead of the battleships giving them more of a scouting and screening function and at least giving them the opportunity to strike separately from the battle line.
As usual the Japanese formation was much more complicated. As envisioned by Japanese doctrine, Kondo hoped to reduce the opposing force by torpedo attack before the heavy units engaged. Battleship Kirishima followed two heavy cruisers in line ahead. They were protected by an inner screen of six destroyers and light cruiser Nagara under Rear Admiral Kimura, while a distant screen designated the “Sweeping Force†under Rear Admiral Shintaro Hashimoto consisting of flagship Sendai and three destroyers scouted several miles ahead.
Lee’s TF 64 had loitered south west of Guadalcanal during the day. Moving to a position to block Kondo, TF 64 looped clockwise around Savo Island passing north of the island, then turning progressively south-southeast and west, keeping the island to starboard.
Kondo was on a southwesterly course entering “The Slot†from the northeast. The Sweeping Force was headed south when at 22:10 Sendai spotted TF 64, steering southeast, off the port bow at a range of about five miles. Hashimoto split his force sending two destroyers, Uranami and Ayanami, counter clockwise around Savo to set up an ambush while Sendai and one destroyer followed the Americans.
Sandai reported TF 64 as two cruisers and four destroyers. Kondo detached light cruiser Nagara and four destroyers sending them south, to pass west of Savo Island to join Uranami and Ayanami in their ambush.
22:52 The moon was down. Lee changed course to the west taking the eastern half of Hashimoto’s sweeping force out of the radar shadow. 23:00 Washington picked up Sendai at a range of 16,000 yards. For fifty minutes high quality Japanese optics, made by companies that would later become famous for cameras and copiers had proven superior to the new technology of radar.

23:17 Washington and South Dakota opened fire on Sendai at 11,000 yards. Sandai and her accompanying destroyer made smoke and withdrew. Disappearing from South Dakota’s radar, she thought at least her target was sunk, but instead they looped back and resumed trailing the Americans.
23:22 The other two destroyers of the “Sweeping Forceâ€, Uranami and Ayanami, had just come around the west side of Savo, when Walke, Benham, and Preston opened fire on them at a range of 15,000 yards. The range quickly closed to point blank.
23:25 Gwin, which had been firing star shells to illuminate Sendai, detected light cruiser Nagara and her four destroyers, in the shadows of Savo, only 1600 yards behind the first two destroyers and opened up on them. The Japanese responded quickly with guns and torpedoes.
23:27 Preston was hit by gunfire, her superstructure burning fiercely. She sank in nine minutes. She was hit five times and her torpedo warheads caught fire. She rolled, slowly capsized, hung for ten minutes with her bow in the air, then went down by the stern with the loss of 116 officers and men including her captain.
23:30 Uranami and Ayanami launched their torpedoes. As they continue counterclockwise around Savo, the Ayanami was hit at 23:32. She sank about midnight, scuttled after Uranami removed her crew.
23:32 Walke was hit by shell fire and at 23:38 a torpedo tore away her forecastle and sent the number two five inch mount 100 feet into the air. She sank at 23:43 with the loss of 75 of her crew also including her captain. The stern section plunged and her depth charges exploded killing crewmen in the water. The bow section continued to float, a hazard to ships following in her wake.
23:33 South Dakota suffered electrical failures from after being hit. Against doctrine three of four sections of her electrical system had been tied together. Power was restored with minor exceptions at 0036, but the loss of power to radios, radar, and weapons at a critical period was devastating to the morale of the crew that suddenly found themselves blind and helpless. The wreckage of sinking destroyers and men in the water destroyed the American formation. Washington dodged left to avoid them. South Dakota dodged right and was silhouetted by the burning destroyers.
23:35 Nagara and her four destroyers launch their torpedoes.

23:38 Benham was hit by a torpedo at about frame 6, destroying her bow back to frame 14. As she withdrew with Gwin she will also sink, finished off by Gwin’s guns after she begins to break up the afternoon of November 15. There were no deaths among Benham’s crew and only seven injured. LCdr Taylor, Benham’s CO was awarded the Navy Cross for his attempts to save his ship.
23:41 South Dakota fired at the eastern half of the sweeping force. This required aiming the aft turret directly over the stern. The blast set fire to the three scout planes on the stern and shock knocked out her SG surface search radar which remained inoperative for five minutes. The next salvo blew two of the planes overboard and extinguished most of the fires. With fires on her stern and backlit by the burning destroyers South Dakota made a tempting target. Kirishima, two heavy cruisers, and their two escorting destroyers moved in for the kill.
23:48 Lee detached his two surviving destroyers, allowing them to limp away.
23:48 South Dakota was on course 300. She picked up a target at 070 relative, 5,800 yds on reciprocal course. South Dakota was illuminated by the second ship in the Japanese Main Body.
23:55 Kimura’s flagship, Nagara, and the four accompanying destroyers launched 34 torpedoes at South Dakota. All missed.
00:00 Washington opened fire on Kirishima at 8,400 yards. Kirishima and the cruisers opened fire on South Dakota then at a range of about 5,500 yards. South Dakota returned fire on

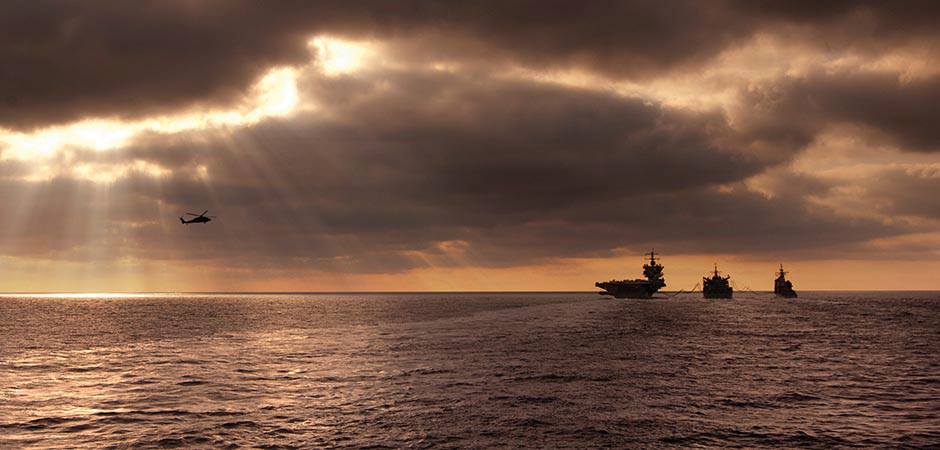
- The Japanese battleship Kirishima takes hit after hit from Washington (BB-56) as the battle reaches its climax.

the illuminating ship. When the search lights were extinguished and the third ship started illuminating South Dakota, she shifted secondaries to the third ship. Her 16 inchers fired first at the second ship and then shifted to the third. Enemy fire started hitting South Dakota almost immediately after the illumination and continued until 0005.Steering and engine control were never lost, but there was extensive damage to radar, radio, fire control and internal communications.
00:07 Washington had hit Kirishima with nine 16†and about forty 5â€. She was hopelessly wrecked, her topsides ablaze.
00:08 Firing ceased when all targets were lost. South Dakota withdrew from the fight and made for the prearranged rendezvous point. South Dakota had 38 killed or missing and 60 wounded. She had been hit at least 26 times including one 5 inch, six 6 inch, eighteen 8 inch and one 14 inch. Damage was later deemed superficial, but her fighting ability had been seriously reduced and she would be sent back to the US for refit as soon as a replacement arrived. Most armor piercing projectiles passed though the ship’s structure without detonating, apparently because of excessively long delay fuses chosen in the hope that near shorts (hitting the water short of the target) would proceed under water, and penetrate the hull below the waterline before the shell exploded. Ironically the single 14 inch shell that hit South Dakota and jammed her after turret was not an armor piercing round. In fact during the course of the entire war, no American battleship was ever hit by an armor piercing round from a Japanese battleship. (Campbell)
Washington lost track of South Dakota and did not know her condition. In an attempt to lead the Japanese away from her and his crippled destroyers, Washington continued north. Along the way she dodged several torpedoes. Here the decision to sacrifice some speed for maneuverability, giving her twin rudders, seems to have paid off. Even so the US battleships were lucky not to have been hit by Japanese torpedoes. Even Tanaka’s escorts got into the battle when two destroyers fired torpedoes at Washington at 00:39. Certainly some of the credit for the rare failure of the Japanese torpedo attack must go to the destroyers that disrupted the attempted ambush.
00:25 Kondo had had enough and ordered all ships not actively engaged to withdraw leaving Kirishima off the northwest coast of Savo, like Hiei before her, unable to steer. Sendai and escorting destroyers removed the crew, before she was scuttled at 0320. In all, the Japanese suffered 249 men killed and 84 wounded. Heavy cruiser Atago and light cruiser Nagara sustained only superficial damage. Heavy cruiser Takao and light cruiser Sendai were undamaged.
Unlike the battle two nights earlier, this was clearly an American victory. The Japanese lost a battleship and a destroyer totaling 34,070 tons. The Americans lost three destroyers totaling 4,909 tons. Washington took not a single hit.
Even so this victory was less significant than the blood bath two nights earlier, because most (but not all) of the damage to the transports had already been done.
Tanaka faced a painful decision. Only four of the original eleven transports were still afloat. If he turned them around and headed for home, they would almost certainly be sunk without  accomplishing anything after so much sacrifice. If he anchored them off Guadalcanal, loss would be even more certain, but some of the troops and supplies might make it ashore. Ultimately after receiving conflicting direction from his confusing chain of command, he chose to run the transports aground, assuring that at least part of their supplies would be landed. They were run ashore at about 04:00. They were attacked by planes from Henderson field and Enterprise, Army artillery, coast defense batteries, and ultimately a new arrival, destroyer Meade. Meade was eager to try out her new 40 mm guns which proved as effective against transports as against aircraft. The eleven transports lost totaled 77,608 tons. (Morison)
After dispatching the transports and working over the beach where the supplies and reinforcements were landed, Meade was then joined by a PT boat, landing and patrol craft, and an aircraft spotter in rescuing 135 men from the Walke and 131 from Preston (Morison).
————————————————————————————————————
WHAT WERE THE LESSONS TO BE LEARNED?
On the American side there was a clear need to understand the characteristics and limitations of your equipment, notably radar and the failed torpedoes. There was still a need for intelligence about the Japanese torpedoes. Task forces needed to operate and train together. There was the simple requirement of proper use of pro-words and radio discipline. Combat Information Centers were still to be developed. The danger of keeping aircraft, filled with gasoline, on deck was once again demonstrated.
Reasons sited by Admiral Tanaka for the failure of Japanese reinforcement efforts:
–Command Complications—multiple bosses, Combined Fleet, the Eleventh Air Fleet, and the Eighth Fleet. The result was confusing and at some times conflicting and incompatible.
–Force composition—forces were hastily thrown together without the opportunity to train together.
–Inconsistent operation plans—there was never a consistent operation plan.
–Communication failures
–Poor Army-Navy coordination—planning was done independently without coordination.
–Underestimation of the enemy.
–Inferiority in the air.
Basically I think the Japanese failed because they held back. The Americans put everything they had into the battle. Some of the units even entered the battle with wounds from previous engagements. Enterprise’s forward elevator was still not working after the Battle of Santa Cruz. South Dakota’s most forward 16†turret was not used because of a bomb hit from the same battle (Crenshaw). A torpedo bomber had intentionally crashed into San Francisco’s after control position hours before she committed to fighting battleships at point blank range. Some of the destroyers also fought with significant equipment like fire control radars out of commission.
Unlike the Americans, the Japanese seemed to have a predisposition to try to fight with the minimum force that seemed would succeed. How different the battles would have been, if the Japanese had also used the other two battleships they had available. And where was the Yamato, in port as always. Where were the other six battleships the Japanese had? All were better armed and armored than Kiei and Kirishima, and almost as fast.
The Japanese looked forward to an ultimate Mahanian sea battle that would decide the war. What they failed to see was that this was their opportunity. With 30,000 Marines on Guadalcanal and Tulagi, the US Navy had no choice but to fight to keep them supplied, or if that failed to evacuate them. With a substantial advantage in ships, it was the Japanese’s opportunity to score a crushing victory, but they held back and husbanded their resources for some future opportunity. Ultimately the great battle would come two years later in the waters of the Philippines, when the Japanese would be out numbered approximately three to one.
In the end, the Japanese managed to deliver only 2000 men, 1,500 bags of rice (a four day supply), and 260 round of mountain howitzer ammunition which was bombed and destroyed the same day, at a cost of two battleships, a heavy cruiser, three destroyers, and eleven transports (Dull). Tanaka reported that most of the men in the transports made it ashore, but without supplies and heavy equipment, soon each additional man would be one more that would need to be evacuated.
———————————————————————————————————–
In both these night battles, ships that were already damaged and on fire distracted their enemies from other threats, Hiei on 13 November and South Dakota on 14/15 November. As we will see, it will happen again.

- Washington (BB-56) after the night action of 14-15 November 1942.

—————————-
References:
Breyer, Siegfried, Battleships and Battle Cruisers 1905-1970, translated from the German by Alfred Kurti, Doubleday, 1973
Campbell, John, Naval Weapons of World War Two, Conway Maritime Press Ltd, 1985
Chesneau, Roger, ed., Conway’s All the World’s Fighting Ships, 1922-1946, Conway Maritime Press Ltd, 1980
Crenshaw, Russell Sydnor, Jr., South Pacific Destroyer, Naval Institute Press, 1998
Dull, Paul S., A Battle History of the Imperial Japanese Navy (1941-1945), Naval Institute Press, 1978
Lacroix, Eric and Linton, Wells II, Japanese Cruisers of the Pacific War, Naval Institute Press, 1997
Morison, Samuel Eliot, History of United States Naval Operations of World War II, Vol. V, The Struggle for Guadalcanal, August 1942—February 1943, Little, Brown and Co., 1948
SWD-1, Summary of War Damage to US Battleships, Carriers, Cruisers, Destroyers, and Destroyer Escorts, 17 October 1941 to 7 December 1942, reprint by The Floating Drydock
Tanaka, Raizo, “The Struggle for Guadalcanal,†from The Japanese Navy in World War II, Dr. David C. Evans, editor, Naval Institute Press, 1969, 1986
Young, Peter, ed., The World Almanac Book of World War II, Bison Books Ltd, 1981
Cross-posted at USNI blog